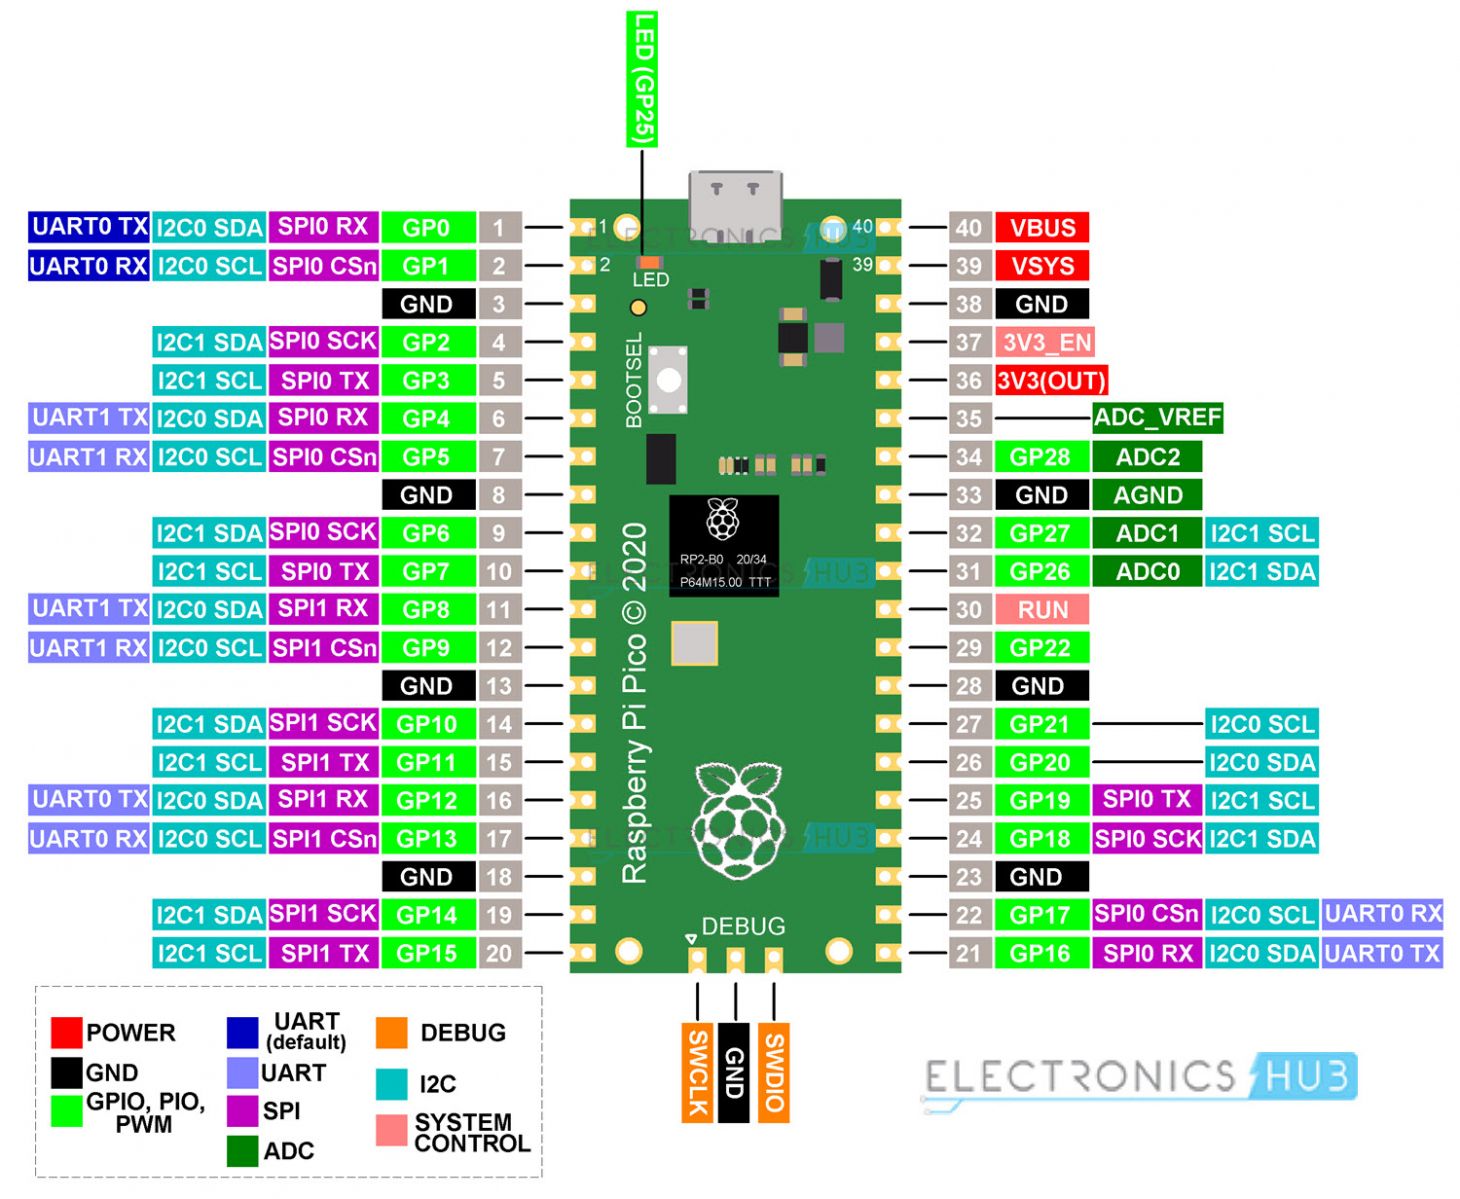
Pico
Pinout

1. Setting Up MicroPython on the Raspberry Pi Pico
- Download MicroPython UF2: Get the UF2 file from the official MicroPython site.
- Flash the Pico:
- Hold down the BOOTSEL button on the Pico and connect it to your computer via USB.
- Release the button once it appears as a storage device.
- Drag the MicroPython UF2 file to the Pico drive. It will reboot with MicroPython installed.
2. Using Thonny IDE for MicroPython
- Install Thonny: It’s a lightweight IDE for Python and MicroPython.
- Configure Thonny:
- Open Thonny and go to Tools > Options > Interpreter.
- Select MicroPython (Raspberry Pi Pico) as the interpreter and choose the correct USB port.
- You can now write code in Thonny and run it directly on the Pico.
3. Basics of the machine Module in MicroPython
- The
machinemodule provides access to the hardware components of the Pico, such as GPIO, PWM, ADC, I2C, and SPI.
4. GPIO Basics
LED Blinking Example
To control an LED connected to GPIO pin 15:
from machine import Pin
from time import sleep

# Configure pin 15 as an output
led = Pin(15, Pin.OUT)

# Blink the LED
while True:
    led.toggle()  # Toggle the LED state
sleep(1) # Wait 1 second5. Using PWM for LED Brightness Control
To control LED brightness with PWM on GPIO pin 15:
from machine import Pin, PWM
from time import sleep

led = PWM(Pin(15))  # Initialize PWM on pin 15
led.freq(1000)      # Set frequency to 1000 Hz

# Increase and decrease brightness
while True:
    for duty in range(0, 65536, 512):  # Gradually increase brightness
        led.duty_u16(duty)            # Set duty cycle
        sleep(0.01)
    for duty in range(65535, 0, -512):  # Gradually decrease brightness
        led.duty_u16(duty)
        sleep(0.01)
6. Analog Input with ADC
The Pico has three analog input pins: ADC0 (GP26), ADC1 (GP27), and ADC2 (GP28).
Read Analog Input Example
To read data from a potentiometer connected to ADC0 (pin GP26):
from machine import ADC
from time import sleep

pot = ADC(26)  # Connect potentiometer to GP26

while True:
    value = pot.read_u16()          # Read 16-bit analog value
    voltage = value * (3.3 / 65535) # Convert to voltage (3.3V reference)
    print("ADC Value:", value, "Voltage:", voltage)
    sleep(1)
7. I2C Communication
The Raspberry Pi Pico supports I2C, allowing communication with various devices like displays and sensors.
I2C Setup and Scanning for Devices
To scan for I2C devices connected to I2C0 (default pins SDA: GP4, SCL: GP5):
from machine import Pin, I2C

i2c = I2C(0, scl=Pin(5), sda=Pin(4), freq=400000)  # Set up I2C on GP4, GP5
devices = i2c.scan()  # Scan for connected I2C devices
print("I2C devices found:", devices)
8. SPI Communication
SPI is commonly used to communicate with SD cards, sensors, and displays.
Basic SPI Setup
To set up an SPI connection on SPI0 (SCK: GP2, MOSI: GP3, MISO: GP4):
from machine import Pin, SPI

spi = SPI(0, baudrate=1000000, polarity=0, phase=0, sck=Pin(2), mosi=Pin(3), miso=Pin(4))

# To read and write data, use spi.read() and spi.write() functions.
9. Using the Built-in Timer
Timers are useful for scheduling periodic tasks.
from machine import Timer

def blink(timer):
    led.toggle()  # Toggle the LED every second

led = Pin(15, Pin.OUT)
timer = Timer()
timer.init(freq=1, mode=Timer.PERIODIC, callback=blink)  # Call blink() every second
10. UART Communication
The Pico has two UART peripherals, allowing serial communication with other devices.
UART Setup and Communication
Set up UART0 (TX: GP0, RX: GP1):
from machine import UART

uart = UART(0, baudrate=9600, tx=Pin(0), rx=Pin(1))

# Write data
uart.write("Hello from Pico!")

# Read data
if uart.any():  # Check if data is available
    data = uart.read()
    print("Received:", data)
11. A Full Example: Temperature and LED Control with ADC and PWM
This example reads the temperature using an analog temperature sensor and dims an LED based on the temperature reading.
from machine import Pin, PWM, ADC
from time import sleep

led = PWM(Pin(15))  # LED connected to GP15
led.freq(1000)
temp_sensor = ADC(4)  # Internal temperature sensor (connected to ADC4)

while True:
    reading = temp_sensor.read_u16()      # Read temperature sensor value
    temperature = 27 - (reading - 0.706) / 0.001721  # Convert to Celsius

    # Map temperature to LED brightness (for example, scale 0-50 C to 0-65535 PWM duty)
    brightness = int(min(temperature, 50) / 50 * 65535)
    led.duty_u16(brightness)

    print("Temperature:", temperature, "°C", "LED Brightness:", brightness)
    sleep(1)
12. Saving and Running Scripts on Boot
To automatically run a script on boot, save it as main.py on the Pico’s filesystem:
- Write the script in Thonny.
- Go to File > Save as and save it as
main.pyon the MicroPython device. - When the Pico is powered up, it will automatically execute
main.py.
Additional Tips
- Error Handling: Use
tryandexceptblocks to catch errors and prevent crashes. - GPIO Cleanup: Use
.deinit()to reset pins when they are no longer needed.
This provides a solid foundation for working with the Raspberry Pi Pico and MicroPython, enabling you to create anything from simple GPIO controls to complex sensor interfaces and communication with other devices.